Kristanne has a small incandescent lamp with a reservoir on top in which she puts scented candle wax. The heat from the bulb melts the wax. This lamp annoys me regularly because she turns it on during the day and then I go to bed, realize the darned thing is still on, and have to get out of bed to go turn it off. For myself, I don't enjoy the scented wax all that much and I'd just as soon get rid of it. But, she likes it, so I want to see if I can automate the thing to make it nicer for both of us.


The Lamp
I've already used this lamp to experiment with controlling a relay, since it was a convenient, low-powered target for my experiment.
What I decided I'd like the lamp to do is to:
- Turn on during the day and off at night, automatically. This is a backwards from most light controls but it makes sense (and scents, hyuck, hyuck) in this case.
- Turn on at night when it detects movement. The idea is that when one of us gets up in the middle of the night, the lamp should turn on. It's a small lamp, and not very bright (I believe the bulb is only 30W), so it won't be blinding, but it should provide enough light to be useful.
A PIR motion detector consists of a pair of small thermal sensors, adjacent to one another and wired so that the signal that emerges from the pair is the difference between the two. So, as long as both of them are seeing the infrared radiation levels, there's no signal. But when a warm body emitting IR radiation in the right frequency moves in front of them, one sensor will see the heat before the other, which means the difference signal will be non-zero.
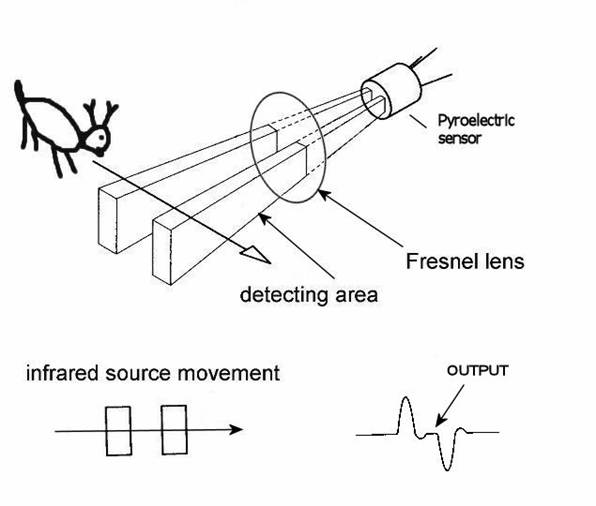
However, the two IR sensor windows are thin slits, which means that the sensors have a fairly narrow angle of detection. So, PIR sensors come with a rounded Fresnel lens which bends IR light coming from various angles towards the sensor windows.
The fact that they're two parallel slits also means their ability to detect motion depends on which direction it's moving. If the slits are vertical, positioned side by side, then horizontal movement in front of them will be detected by one before the other, and the movement will register. But a heat source moving vertically into their field of view will be seen by both at once, and no response will be triggered.
So, by removing the Fresnel lens I can narrow the detection field, and by positioning them to observe horizontal, not vertical, movement I can minimize the chance that someone merely rolling over in bed will trigger it. Some experimentation with a sensor pointed at my bed supported this. However, I did notice that the sensor sometimes triggered by movement far off to the side, not directly in front, even without the lens. To fix that, I can set the sensor back into the body of the lamp a bit, so the lamp body blocks IR light from the sides.


The PIR Sensor, with and without lens, and positioned inside the lamp body
One other possible problem became clear in early experimentation: How can a light sensor detect darkness when it's right next to a lamp that's turned on? Without taking some care about positioning, the light from the lamp will cause the sensor to believe it's light, which will keep the light on. All light sensor based lighting controls face this problem, though for most it's inverted.
The answer is to position the sensor so that it receives plenty of ambient light but little from the lamp itself. I decided to put it on top, since the top of the lamp is a solid metal piece. I was a little concerned that the heat might be problematic, but the data sheet for the light sensor says it can operate well above any temperatures the lamp will achieve.
Here's the schematic:

And, while playing with Fritzing, I also created a printed circuit board schematic, designed for an Arduino Mini. I tried hard to arrange things so it would only need a single trace layer, but the trace between R2 (the photocell) and R3 had to cross the 5V line to the PIR so it's in the bottom layer (which is why it's a different color). Also, I jammed things a little tighter than they should normally fit, for example the PIR header block overlaps with the relay and the photocell overlaps both the relay and R3. But that's okay because the photocell and PIR wouldn't actually be mounted on the board. Anyway, here it is:

For $10 I can get that board made by Fritzing Fab. I think I may order it just to experiment with the process and see if I might want to make some custom boards for other things.
I assembled the circuit on Saturday night, with the relay mounted in the base, the PIR in the side and the photocell on top, but the relay didn't work. I think I wired the transistor backwards. I didn't have time to debug and fix it, though, since I work in my bedroom and Kristanne wanted to go to sleep. I guess I need to set up another work area, probably in the basement.
Even if I'd gotten it working, though, it wouldn't have been done, because I was still using the full-sized Arduino Uno board. I ordered a couple of Minis from Sparkfun, to build it for real. The Mini will fit inside the lamp cylinder, opposite the PIR.
After I get it debugged, connected to the Mini and all installed in the lamp, there will still be one piece missing: Power. I need a transformer/rectifier to convert 110 VAC to 5 VDC. I found some circuit diagrams for one of those online, but I think I'll take the easy way out and just hack up a cheap wall USB charger.
All in all, the end result will include some $20 of hardware plus several hours of my time, all to automate a $5 lamp. However, I've learned a lot.
Finally, here's the code. Very simple Arduino code of this sort is normally all in one file, but I separated it to make it easier to write unit tests (which I haven't yet written, but will, and will post in part 2). Here's the untested code.
scent_lamp.h
const int relayPin = 12;
const int motionPin = 13;
const int lightPin = A0;

// Tunable threshold parameters to divide light levels into three categories:
//
// 1. Dark, or night mode. Low enough light that the lamp should be off, except
//    for a little while after detecting motion.
//
// 2. Moderate, or hysteresis mode. The lamp should stay in the state it's
//    already in. This is mainly to prevent flickering rapidly on and off if
//    the light level is right around the dark/light dividing line.
//
// 3. Light, or day mode. High enough light that the lamp should be on.
const int darknessThreshold = 200;
const int lightThreshold = 300;

// Tunable parameter to set the duration the lamp should stay on after
// detecting motion at night, in milliseconds
const unsigned long motionExpirationTimeMillis = 60000L;

bool lampOn;
unsigned long motionExpirationMillis;

bool lampOnPerLightMeasurement(bool currentState);
bool lampOnPerMotionMeasurement();
scent_lamp.ino
#include "scent_lamp.h"

void setup() {
  pinMode(relayPin, OUTPUT);
  pinMode(motionPin, INPUT);
  pinMode(lightPin, INPUT);
  lampOn = true;
  motionExpirationMillis = millis() + motionExpirationTimeMillis;
}

void loop() {
  lampOn = lampOnPerLightMeasurement(lampOn) || lampOnPerMotionMeasurement();
  digitalWrite(relayPin, lampOn ? HIGH : LOW);
}

bool lampOnPerLightMeasurement(bool currentState) {
  int lightDetected = analogRead(lightPin);
  if (lightDetected > lightThreshold) {
    return true;
  } else if (lightDetected < darkThreshold) {
    return false;
  } else {
    return currentState;
  }
}

bool lampOnPerMotionMeasurement() {
  unsigned long now = millis();
  if (digitalRead(motionPin) == HIGH) {
    motionExpirationMillis = now + motionExpirationTimeMillis;
  }
  return motionExpirationMillis > now;
}


No comments:
Post a Comment